Thursday, 5 July 2012

Creating a public page using Google Reader | The Edublogger

The Complete Educator’s Guide to Using Google Reader | The Edublogger

Creating a public page using Google Reader

A public page is a place for you to collect any of your items in Google Reader that you want to share with other people.

Public pages are handy for educators who want their students to be able to read all posts from the student blogs in one location but don’t want their students to set up their own Google Reader account.

Please note:
  • Previously you could create public pages by making a folder public
  • Now you create a public page using a bundle
  • If you’ve already added a Google Reader blogroll to your blog sidebar then the students can click on the preview link at the bottom of the blogroll to visit your public page and read the latest posts.
  • To add and remove blogs from your Public page you need to edit your Bundle by following the instructions for editing your blogroll.
Here’s how create a public page:
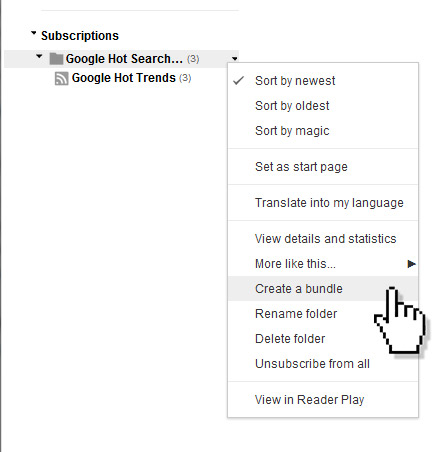
1.  Hover your mouse over the name of a folder you want to create a public page from to display the drop down arrow.
2.  Click on the drop down arrow to display the folder options.
3.  Select Create a bundle.


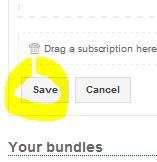
4.  Click Save.

5.  Click on Add a link.

6.  Copy the URL from the address bar.

7.   Now go to Links > Add New in your blog dashboard
8.  Add a title for your Google Reader public page to the Name

9.  Add your Google Reader public page URL to the Web Address 
10.  Select Blogroll in the Categories and the click Add Link

11. Now go to Appearance > Widgets in your blog dashboard
12.  Add your links widget to your sidebar.
13.  You should now see a link to your Public page and students just need to click on this link to read the latest posts.

Embed Google Reader « Affordable Websites

Embed Google Reader « Affordable Websites


Embed Google Reader

How to embed Google Reader rss feed subscriptions.

Embed Google Reader subscription

  1. Log into your Google Reader account.
  2. Mouse hover over the subscription and a little down arrow will appear. Click on the down arrow.
  3. From the drop down menu select ‘New Folder’.
  4. Name the folder and click the ‘OK’ button.
  5. Now you can see the folder you just created and your feed subscription should automatically be inside the fold. You can drag and drop other feeds into this folder that you want to embed also.
  6. Hover over the fold and click the small arrow that appears.
  7. Click the ‘Create a bundle’ option.
  8. Click the ‘Save’ button to save your bundle.
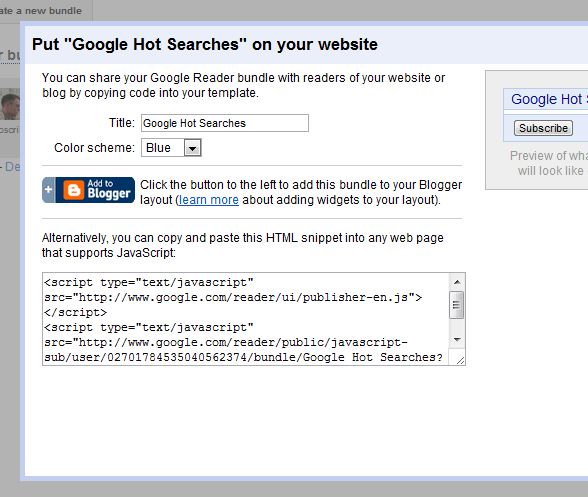
  9. Click the ‘Create a bundle clip link.
  10. Edit the ‘Title’.
  11. Copy the code snippet.
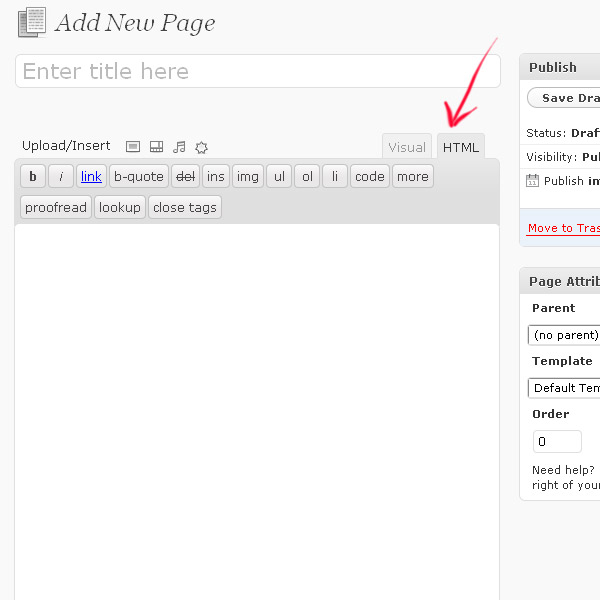
  12. Paste the code snippet into your Website’s HTML. If you’re using WordPress you can paste the code snippet into any page post or widget.
    Note: If you are pasting this code snippet into a WordPress page or post, make sure you’re in HTML mode.

‘Add to Blogger’

  1. Copy the code snippet then click on the ‘Add to Blogger’ icon.
  2. Select your blog from the ‘Select a blog:’ drop-down menu.
  3. Enter a title for your Bundle.
  4. Click on the ‘Edit Content’ link and paste the code snippet inside it.
  5. Click the ‘Add Widget’ button.

Sunday, 24 June 2012

How To Move Your Blogger Blog To Your Own Domain or Subdomain in GoDaddy

How To Move Your Blogger Blog To Your Own Domain or Subdomain in GoDaddy

Did you know that Blogger allows you to have your blog hosted on your own custom domain? Well, it's true. 

You can have your blog up in minutes without the headache of paying for web hosting. You basically continue to blog on Blogger, using the same login and having the same back-end interface (dashboard) but you get to have your own dot com domain. 

This allows you to build your online brand and it also makes your readers remember your web address easier. Don't forget to keep your blogging useful and entertaining!

Move your blogspot blog to your own subdomain

In order to do that, you must follow the fist three steps described in a previous post: How To Make a Subdomain in GoDaddy.

1. Once you are on Domain Details page, look for DNS Manager and click the Launch link.

DNS Manager in GoDaddy

2. You'll land on Zone File Editor where you have to click on Add New Record.

Zone File Editor

3. A popup window will appear - select CNAME (Alias) from the list of options.

Add CNAME Record in GoDaddy

4. If you want to host your blog on a subdomain you previously created then type your full subdomain in the first field and then type ghs.google.com in the Host Name field. Click OK and you're done!

Create CNAME Record - Host and Subdomain

Move your blog to your domain (not subdomain)

If you didn't create a subdomain for your blog and you want to host it on your main domain, then follow the steps below.
  • In the CNAMES section (File Zone Editor - step 2 above), click the Edit symbol (pencil) for the "www" record.
  • In the Points To host name field, type ghs.google.com.
  • Click Save File Zone button.
How to configure your Blogger account
  • Log in to your Blogger account.
  • Go to the Settings tab.
  • Click Publishing.
  • Click the Custom Domain hyperlink.
  • In the Buy a domain for your blog section, click the Switch to advanced settings hyperlink.
  • In the Your Domain field, enter your domain name. For example, enter www.coolexample.com.
  • To specify another location in which to look for files, in the Use a missing files host? section, select Yes and enter the path. If not, specify No. (Most of the time you may wanna specify No.)
  • In the Word Verification field, enter the characters as they display in the image above the field.
  • Click Save Settings.
You're done.

You can now blog your way to success on your own domain! Cheers!

Hack Attack: Set up and host a blog on your home computer

Hack Attack: Set up and host a blog on your home computer


Hack Attack: Set up and host a blog on your home computer

Hack Attack: Set up and host a blog on your home computer

by Adam Pash

Click to viewIf you want to host your own blog, you can purchase a plan at a web hosting provider for a few bucks a month - or you can set it up on your home computer for free.
Weblogs, as most people know them, are web sites made of individual entries of various length, by any number of authors, organized in reverse chronological order. Of course, you know what a blog is - you read Lifehacker, and if you don't already have a blog of your own, you know someone who does.

The cool thing about blogs (and many other web apps, like wikis) is that they don't actually have to live online. A blog can live on your personal computer or somewhere on your network; you can use it as a private journal or as the main conduit for intracompany communication. Or maybe you just want to keep all of your personal data, blog posts included, on your own computer and not on Google's servers. Whatever the reason may be, setting up and hosting a blog on your personal computer is a painless process. Today we'll set up a weblog on your Windows PC using the popular open source blogging software, WordPress.

Note: WordPress is a full-featured, excellent piece of open source blogging software. In order to run it on your computer, you'll need to install an Apache web server, the PHP scripting language, and a MySQL database server. Although setting all of this up is not difficult (the process is detailed below), you can easily avoid the whole shebang and get your own free hosted weblog somewhere like WordPress or Blogger if those sites fit your needs. If you're aware of the alternatives, but you're determined (for whatever reason) to run a blog on your own computer, read on.

How to install and host WordPress on your Windows PC: The slideshow


Hack Attack: Set up and host a blog on your home computer

I've put together a step-by-step guide (7 steps in all) for installing WordPress and all the tools necessary to host it locally, so if you're ready to get blogging, click here (or the image above) to get started.

Note (part the second): Our gallery tool is a bit - erm - quirky at the moment, so to advance from one step to the next, click the link at the end of each description. You can try clicking on the thumbnails to progress, but chances are that doing so will leave you confused.

Getting good with WordPress

Now that you've got WordPress installed on your local computer, you've got a lot of options. If you want to make your blog accessible to the outside world, see:
Keep in mind that you wouldn't be able to run a heavily trafficked blog from your home computer, but if it's just a personal blog for friends and family, hosting it yourself is definitely an option (your service provider may not be into the idea, so you may want to check your ToS).

To get familiar with and tweak your WordPress blog, check out our WordPress tag, specifically:
Got your own blog? Weigh in on how you use it. Got a WordPress blog? Let us hear your favorite plugins, templates, and tweaks. All this and more in the comments.

Adam Pash is an associate editor for Lifehacker with a thing for hosting web apps for personal use on his home computer. His special feature Hack Attack appears every Tuesday on Lifehacker. Subscribe to the Hack Attack RSS feed to get new installments in your newsreader.
Related Stories


@Pat/HeartBurnKid: Like I said, opening the blog to the outside world may violate your providers ToS. That said, unless you're garnering a significant amount of traffic, chances are you'll be safe. I run a personal-use home server all the time without issue.

That said, nothing says you have to open this up to the internet at large. As I said above, you can set up a blog for personal journaling, or just to use on an internal network (e.g., a company blog).

@BostonMark: Again, of course you could purchase a cheap hosting account, but it'll never be as cheap as free. Unless I haven't made it clear, you don't want to set up a blog on your home computer that you expect to get any significant amount of traffic.

Saturday, 23 June 2012

PHP iCalendar

PHP iCalendar

Documentation  :  Forums  :  Download  :  Demo  :  Template tools
---------------------------------------------------------------------------------------

Rapidcal for Rapidweaver - Two Thumbs Down


On a positive note I found a free calendar php script that will work directly with your Mac iCal application. It has many more features, looks better and is easier to read! You can get it for FREE here:

http://phpicalendar.net/

It’s quite customizable and allows you to merge many calendars together. It even has the capability to display multiple calendars one at a time. The user simply selects from a menu which calendar they wish to view. It’s very well thought out and well executed.

This script comes with instructions which are easy to understand. You have to edit a php file and copy a few files to your server but its a piece of cake with any basic ftp program.

Who needs to throw away money when this awesome calendar script does an amazing job for free! It’s even RSS capable so your visitors can subscribe to your calendar!

How to Display Your Standalone Pages in Blogger

How to Display Your Standalone Pages in Blogger

Steps:

1. Navigate to Blogger Dashboard.

2. Click on your Blog Title.

3. Jump to Pages tab.

Note: On this page you will see list of your static pages if you got any. Else it will just show Home which links to your homepage.


4. Now click on drop down button next to Show pages as option and select an option to display your pages in that particular way.


Top Tabs - Your pages will display under your blog header as a horizontal navigation bar.

Side Links - Your pages will display as a list of links on your sidebar.

Don't Show - You can make use of this option if you don't wanna show any of your pages or if you wanna link them manually.


5. Click Save arrangement button on the top.

6. Yeah... you made it. But if you selected to show pages, it will list all your published pages on your blog. If you wanna manage them and get rid of some pages, jump to Layout tab.

7. Now find an element named as Pages.

8. Click Edit link correspond to that element.

9. Now select pages to display and arrange your pages in the configuration pop up window.

10. Click Save button.

11. Now save your blog layout.

Friday, 22 June 2012

Multiple Website Hosting - Subdomains are the Answer!

Multiple Website Hosting - Subdomains are the Answer!

04-Jul-2007
John Michaels


Many business owners find themselves in a quandary over the ways to make the most of their company's web site. This is especially true of those who have the need to maintain more than one web site but do not wish to pay for multiple hosting accounts. If this is you, a subdomain may be the answer.

Subdomains are sort of a site within a site. They are not, however, simply additional pages of an existing web site. The subdomain can have a web site all its own, completely separate from the site located at the main domain name.

To understand the use and purpose of subdomains, it may be necessary to first understand the concept of an internet Domain Name. Every web site that is active on the internet (and there are literally billions of them now - it was estimated as long ago as 1996 that there were more web pages in existence than there were people on Earth) has a unique domain name. There can be only one Ebay dot com, for example, on the entire internet. The domain name, however, is really just a way for humans to relate to the site. Internet servers see web site names as unique I.P. addresses. It is the domain name server that translates those numbers into names and back again.

A subdomain is simply an offshoot of your web site's domain. In terms of the way it appears on the server, the subdomain is simply a folder or a sub directory located within your domain's root directory. Any sub directory can serve as a sub domain. For example, if your web site is "www.mycompany.com" and you store the images for your site in a directory called "images," then you could, if you wished, create a subdomain at "images.mycompany.com". As long as you put an "index.html" page in the folder you should be able to pull it up in a web browser that way. In most cases you will create a new sub directory to be associated with a subdomain and some web hosts do not support subdomains on their servers or put a limit on the number of subdomains you may associate with your site.

The benefits of using subdomains as opposed to opening multiple hosting accounts are twofold. First, you get the obvious benefit of only having to pay for one hosting account. You also benefit from being able to have a completely separate web site, but one that your customers will easily recognize as being associated in some way with your business. Some companies will set up subdomains for various divisions (xyz.com may also have sales.xyz.com or support.xyz.com) and some will use subdomains for various businesses that are all offshoots of the same parent company.

That association could be a downside to using subdomains as well. If you want to keep the relationship between your companies under wraps (like Disney tried so hard to do with Touchstone Pictures so many years ago), you may want to use multiple accounts rather than subdomains.

The web address clandestineproducts.megamall.com would clearly betray that there was some connection between Clandestine Products and Megamall, whether you wanted that information to be known or not.

John Michaels is a freelance author for WebHostPacks.com where he regularly publishes articles on how to find a cheap web host and reviews of low cost web hosting services.